

准备工作:
本文以Centos7.x为例。
建议关闭Iptables或者Firewalld防火墙,若不关闭,请单独在防火墙中放行端口。
开设4台云服务器(服务器数量需根据自己情况开设)所有服务器开设在同一个集群,并设置内网通信。
192.168.137.16(前端调度器)
192.168.145.63(文件服务器:存放web文件以及数据库,当然数据库也可单独购买一台服务器存放,安装宝塔环境+nginx+mysql)
192.168.138.229(web1服务器,安装宝塔环境+nginx)
192.168.255.66(web2服务器,安装宝塔环境+nginx)
一、前端调度器。
192.168.137.16 该服务器不需要我们做特殊操作,只需在西部数码后台安装系统为nginx负载均衡的系统即可,并添加后端服务器及设置域名绑定和白名单。
二、文件服务器:192.168.145.63
1、登录宝塔创建好站点并绑定好域名,和数据库,并将数据库允许远程连接,因文件服务器不直接对外访问,创建好站点后可将nginx服务停止掉。
2、登录服务器执行如下命令,安装NFS和Rpcbind服务
若您的系统是Centos6版本,请分别执行如下命令,将服务设置为自启。yum -y install nfs-utils rpcbind
若系统是Centos7以上版本,请分别执行如下命令,将服务设置为自启。
chkconfig nfs on
chkconfig rpcbind on
若系统是Centos8那么在执行systemctl enable /usr/lib/systemd/system/rpc-statd.service 及 systemctl enable /usr/lib/systemd/system/nfs-idmapd.service 这领条条命令时,会如图错误
systemctl enable rpcbind
systemctl enable nfs-server
systemctl enable /usr/lib/systemd/system/rpc-statd.service
systemctl enable /usr/lib/systemd/system/nfs-idmapd.service
[root@ebs-73760 ~]# systemctl enable /usr/lib/systemd/system/rpc-statd.service
The unit files have no installation config (WantedBy, RequiredBy, Also, Alias
settings in the [Install] section, and DefaultInstance for template units).
This means they are not meant to be enabled using systemctl.
Possible reasons for having this kind of units are:
1) A unit may be statically enabled by being symlinked from another unit's
.wants/ or .requires/ directory.
2) A unit's purpose may be to act as a helper for some other unit which has
a requirement dependency on it.
3) A unit may be started when needed via activation (socket, path, timer,
D-Bus, udev, scripted systemctl call, ...).
4) In case of template units, the unit is meant to be enabled with some
instance name specified.
解决方法是分别编辑vi编辑 /usr/lib/systemd/system/rpc-statd.service 及 /usr/lib/systemd/system/nfs-idmapd.service 并在文件末尾都添加如下代码并保存
编辑后的内容应该如下Install配置单元即可(红色区域是新增的)再去执行 systemctl enable /usr/lib/systemd/system/rpc-statd.service 及 systemctl enable /usr/lib/systemd/system/nfs-idmapd.service 即可正常。
[Install]
WantedBy=multi-user.target
[Unit]
Description=NFS status monitor for NFSv2/3 locking.
DefaultDependencies=no
Conflicts=umount.target
Requires=nss-lookup.target rpcbind.socket
Wants=network-online.target
After=network-online.target nss-lookup.target rpcbind.socket
PartOf=nfs-utils.service
[Service]
Environment=RPC_STATD_NO_NOTIFY=1
Type=forking
PIDFile=/var/run/rpc.statd.pid
ExecStart=/usr/sbin/rpc.statd
[Install]
WantedBy=multi-user.target
3、启动NFS和Rpcbind服务,
若您是Centos6版本,分别执行如下命令
若您是Centos7以上版本,分别执行如下命令
service rpcbind start
service nfs start
若您的系统是Centos8版本,请执行如下命令
systemctl restart rpcbind
systemctl start nfs-server
systemctl start nfs-lock
systemctl start nfs-idmap
4、在文件服务器中vi编辑 /etc/exports 文件,并写入如下代码:
systemctl restart rpcbind
systemctl start nfs-server
systemctl start nfs-idmapd
说明:
/home/wwwroot/webs.tag.gg 192.168.138.229(rw,async,root_squash) 192.168.255.66(rw,async,root_squash)
/home/server/panel/vhost/nginx 192.168.138.229(rw,async,root_squash) 192.168.255.66(rw,async,root_squash)

/home/wwwroot/webs.tag.gg 为文件服务器中创建网站目录
/home/server/panel/vhost/nginx 为文件服务器中nginx下站点配置文件目录,
192.168.138.229 和 192.168.255.66 分别为两台Web服务器,上面代码表示共享这两个目录给229和66这两台服务器,并允许对这两个目录有写入权限和同步权限。
在实际生产环境中,请将目录及ip更换为自己的即可。
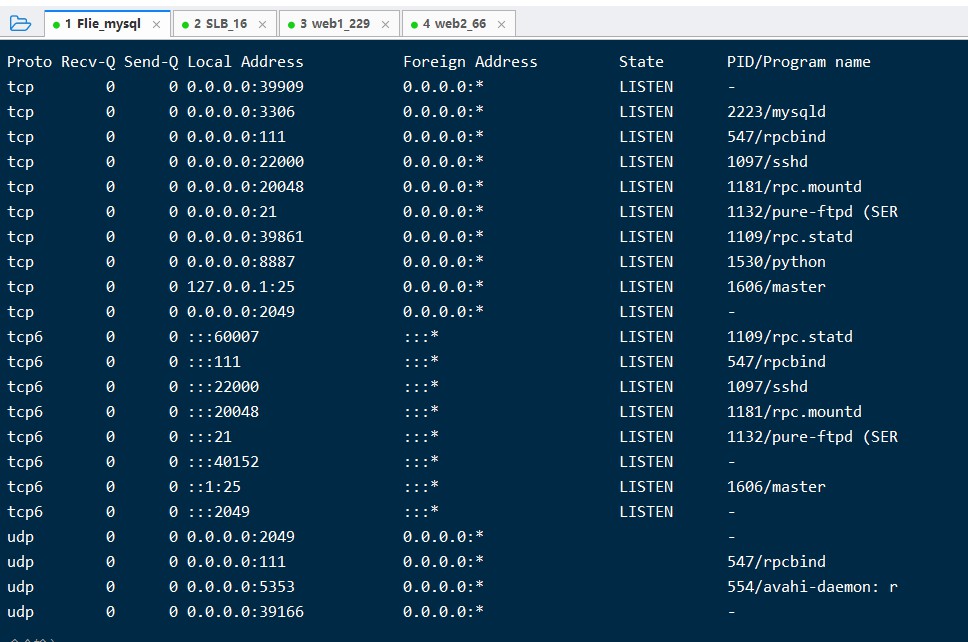
文件服务器配置完毕后执行 netstat -lunpt 可查看到nfs服务等都启动正常了

三、Web服务器配置
1、分别登陆两台Web服务器依次执行如下命令:
2、登陆服务器分别执行如下命令,将服务设置为自启并启动。yum -y install nfs-utils rpcbind
若您是Centos6版本,分别执行如下命令
若您是Centos7版本,分别执行如下命令
chkconfig rpcbind on
service rpcbind start
/etc/init.d/rpcidmapd start
chkconfig --add rpcidmapd
chkconfig rpcidmapd on
若您的是Centos8版本,请执行如下命令
systemctl restart rpcbind
systemctl start nfs-idmap
systemctl enable rpcbind
systemctl enable /usr/lib/systemd/system/nfs-idmapd.service
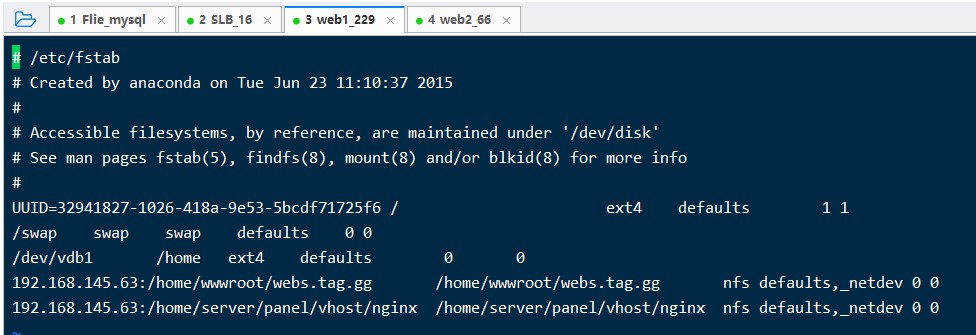
3、分别在两台Web服务器中vi 编辑 /etc/fstab 文件,并写入如下代码
systemctl restart rpcbind
systemctl start nfs-idmapd
systemctl enable rpcbind
systemctl enable /usr/lib/systemd/system/nfs-idmapd.service #若有报错,请按照上面方法处理。
若系统是Centos8版本,请参考如下方法在fstab中挂载:
192.168.145.63:/home/wwwroot/webs.tag.gg /home/wwwroot/webs.tag.gg nfs defaults,_netdev 0 0
192.168.145.63:/home/server/panel/vhost/nginx /home/server/panel/vhost/nginx nfs defaults,_netdev 0 0
192.168.145.63:/home/wwwroot/webs.tag.gg /home/wwwroot/webs.tag.gg nfs nolock 0 0
192.168.145.63:/home/server/panel/vhost/nginx /home/server/panel/vhost/nginx nfs nolock 0 0

说明:
通过NFS方式将文件服务器(145.63)中的/home/wwwroot/webs.tag.gg目录挂载到当前Web服务器/home/wwwroot/webs.tag.gg目录
通过NFS方式将文件服务器(145.63)中的/home/server/panel/vhost/nginx目录挂载到当前Web服务器/home/server/panel/vhost/nginx目录
4、设置确认无误后执行如下命令,刷新挂载
刷新挂载后执行如下命令可参考到挂载信息了mount -a
df -h

此时,在文件服务器网站根目录操作文件会直接同步到这两台Web服务了,反之,在两台Web服务中更新文件,也会同步到文件服务器了
将域名解析到调度器ip,测试访问正常了,如下

文章由301免备案跳转网站原创,转载请注明出处,https://blog.tag.gg/showinfo-3-35821-0.html 否则追究法律责任,
为了测试负载均衡是否生效,可以参考如下方法测试
1、将web1的nginx服务停止后测试看站点能否访问,(我测试可以访问,则说明访问到了web2)
2、将web2的nginx服务停止访问测试看是否能访问,(我测试无法访问,因为后端两台web服务都停止了)
3、将web1的nginx访问启用后测试看站点能否访问,(我测试可以访问,则说明访问到了web1)
若ssh远程登录到web服务器进入挂载目录修改文件提示权限问题,这个有两个原因:
1、共享目录是www权限,而在共享时设置了root_squash权限导致无法在web中使用root修改。(实际上站点写入等都没问题)
2、可以在文件管理中将相关目录权限设置为777即可正常在web中修改了(不建议)
自己上传了一套完整的php程序测试安装及权限一切正常。


文章评论 本文章有个评论